NBI Online Appointment 2026: How to Book NBI Clearance Online
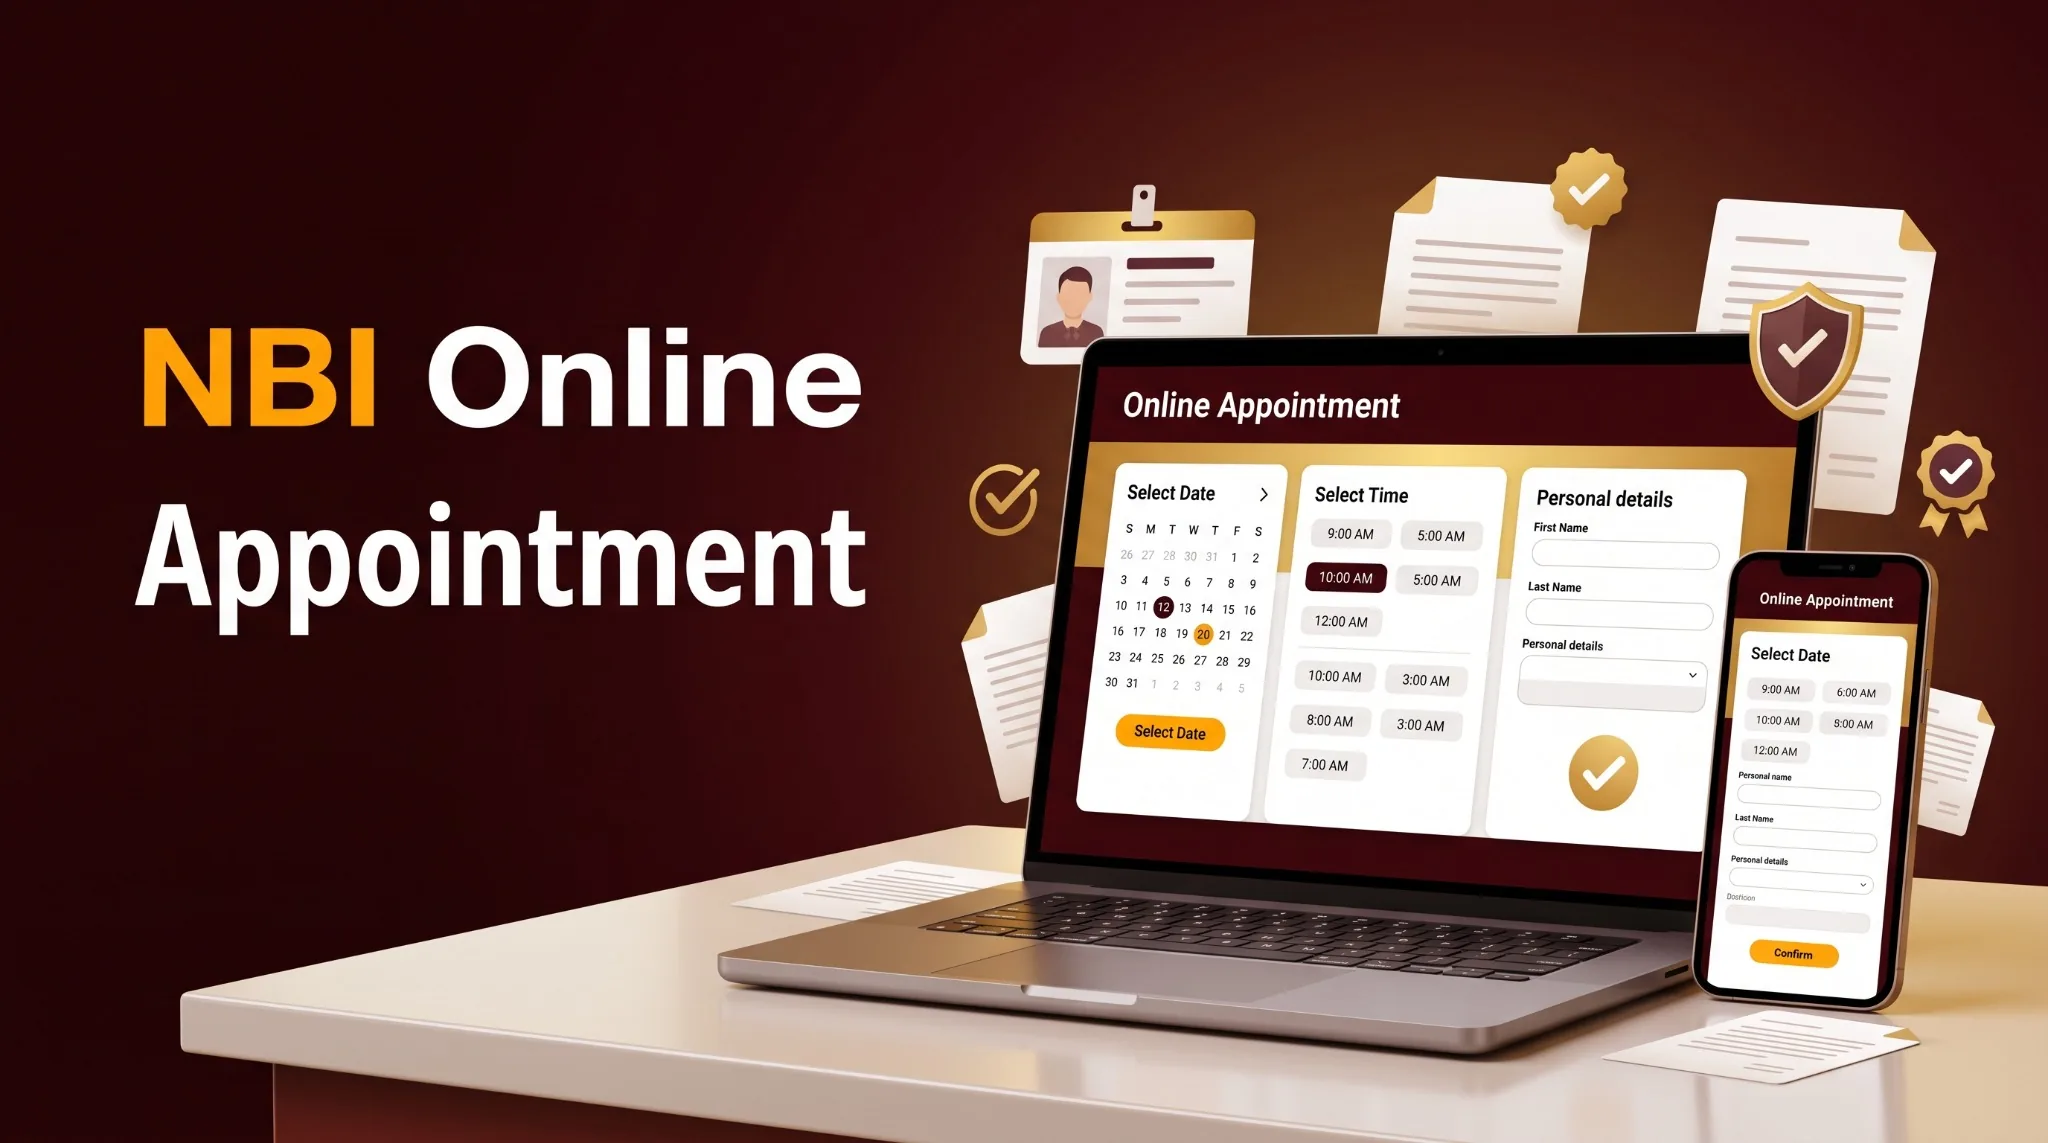
Getting your NBI Clearance used to mean waking up before sunrise, standing in line for hours, and still risking going home empty-handed. That is no longer the case. The NBI Online Appointment system lets you register, choose your branch, book a slot, pay the fee, and arrive only for biometrics everything else done from your phone or laptop before you leave the house.
This is the complete guide to the NBI Online Appointment process in 2026 covering registration, valid IDs, fees, payment, what happens at the branch, and what to do when problems come up.
Quick Summary
NBI Clearance online applications are completed at clearance.nbi.gov.ph. The standard fee is ₱155 for most applicants, ₱130 base plus ₱25 e-payment service charge. First-time job seekers apply free at firsttimejobseekers.nbi.gov.ph with a Barangay Certification. After completing your online registration and payment, you visit your chosen NBI branch for photo capture, fingerprint scan, and digital signature. No Hit applicants receive their printed clearance the same day, usually within 20 to 30 minutes after biometrics. HIT applicants return on a scheduled date for additional verification.
| Detail | Information |
|---|---|
| Official NBI Clearance Fee | ₱130 |
| Common Online Total | ₱155 when a ₱25 online service fee is added |
| Requirements | Two valid government-issued IDs |
| Processing Time | Same day for most No Hit applicants |
| Official Portal | clearance.nbi.gov.ph |
Last updated: June 2026
What is an NBI Online Appointment?
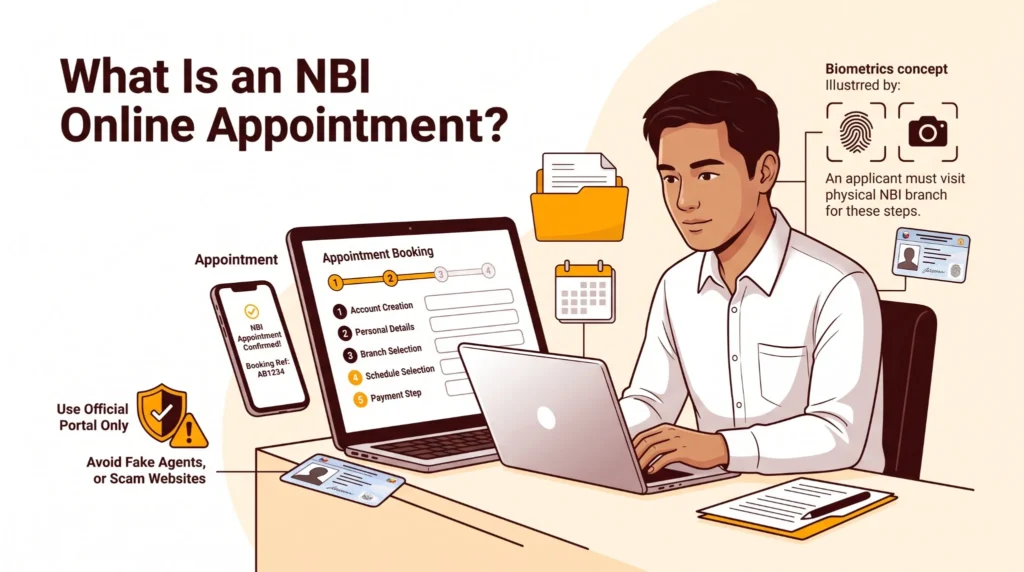
An NBI online appointment is the official booking process for an NBI Clearance application. You create an account, enter your personal details, choose an NBI branch and schedule, pay the fee, and visit the branch for biometrics.
The National Bureau of Investigation issues NBI Clearances for employment, travel, visa applications, government requirements, and other official transactions. The online process helps applicants avoid filling out everything manually at the branch.
You still need to appear personally because NBI staff must capture your photograph, fingerprints, and signature. Online registration does not replace your branch visit.
NBI Online Appointment vs Walk-In
The NBI Online Appointment system is the standard method for getting an NBI Clearance in 2026. Walk-in processing exists at some branches but is extremely limited, unpredictable, and not recommended.
When you book online, you lock in a specific date, time, and branch before traveling. Your payment is linked to your application. You arrive knowing exactly where to go and what to show. Walk-in applicants have no guarantee of being accommodated — even after a long commute, they can be turned away if the branch is at full capacity.
Book online at clearance.nbi.gov.ph. It takes about 10 to 15 minutes from start to confirmation.
What NBI Clearance Looks Like
NBI Clearance is a single-page official document printed on tamper-resistant green security paper. Knowing what to look for helps you verify the document is genuine and catch errors before leaving the branch.
The clearance contains:
The moment you receive your clearance, check the spelling of your name before leaving the counter. One wrong letter can cause problems with embassy submissions or employer verification. Errors must be corrected before you leave the branch corrections after release require a completely new application.
NBI Clearance is valid for 1 year from the date of issuance. Most employers accept a clearance issued within the past year, but embassies and sensitive positions often prefer a clearance issued within the last 6 months. Always confirm the specific requirement with the organization requesting it.
NBI Clearance Fee: ₱130 or ₱155?
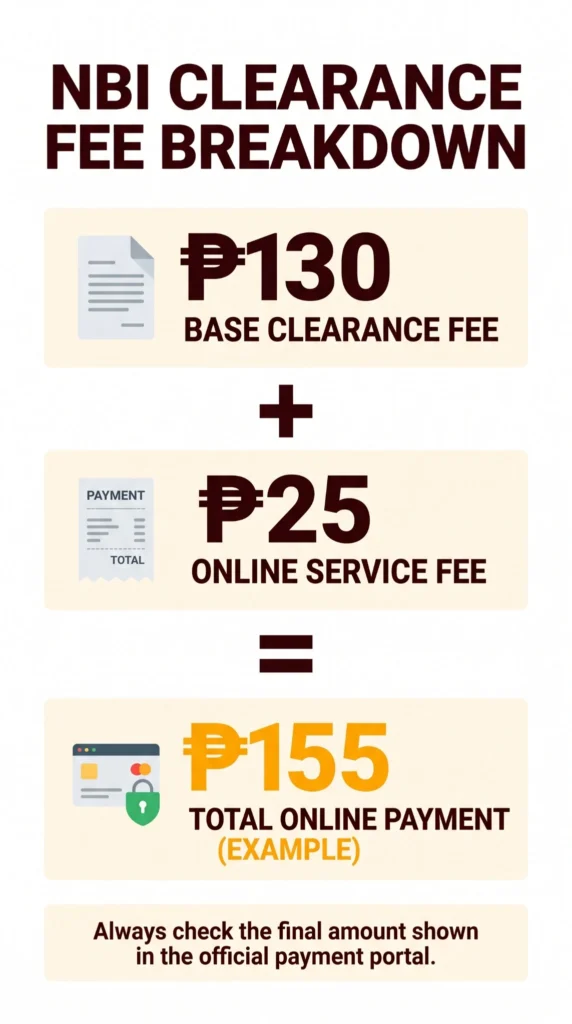
The official NBI Clearance fee is ₱130. When you pay through an online payment method, a ₱25 convenience or service fee may be added, making the total ₱155 for that payment transaction.
The ₱130 amount is the government clearance fee. The extra ₱25 is usually a service charge from the selected online payment channel, not a separate NBI Clearance fee.
Always check the exact total shown on your NBI payment page before you confirm payment. Different payment options can show different service charges.
NBI Clearance Fee Breakdown
| Application Type | Fee |
|---|---|
| New application — cash at counter | ₱130 |
| New application — e-payment (GCash, Maya, card, etc.) | ₱155 |
| Standard Renewal — branch pickup | ₱155 |
| Quick Renewal — Metro Manila delivery | ₱355 |
| Quick Renewal — provincial delivery | ₱430 |
| First-time job seekers — under RA 11261 | Free |
Paying a higher fee does not speed up your processing. Every applicant follows the same queue regardless of payment amount. Anyone claiming they can fast-track your NBI Clearance for extra money is running a scam. For a complete breakdown of all fees including delivery and apostille costs, read our NBI Clearance Fee Guide.
How to Pay NBI Clearance Online
To pay your NBI Clearance fee online, follow these steps:
You may see payment options such as e-wallets, banks, payment centers, or other channels available in the portal. Use GCash only when it appears as an official payment option for your own application.
NBI Clearance Requirements and Valid IDs
The main NBI Clearance requirements are your online appointment details, payment proof, and two valid government-issued IDs. Your information on the NBI portal should match the information on your IDs.
You do not need printed passport photos for a standard NBI online appointment. NBI captures your photo digitally at the branch during biometrics.
Valid IDs for NBI Clearance
Bring two original and valid IDs. The official NBI list includes:
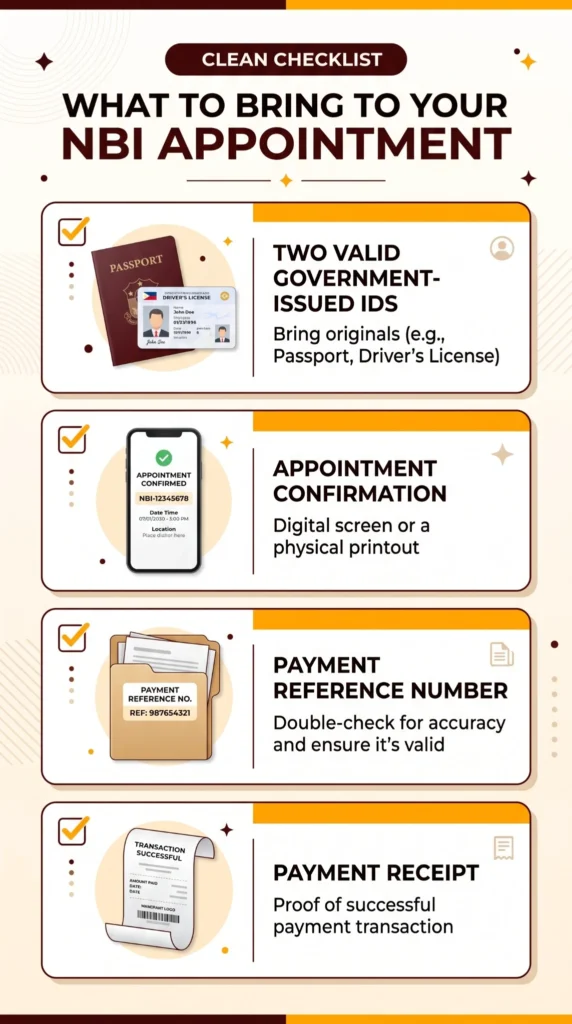
What to Bring to Your NBI Appointment
Bring these items on appointment day:
Bring This Box: Keep your two IDs, payment receipt, and appointment screenshot in one folder or envelope. This makes the branch process faster and reduces the chance of losing important papers.
First-Time Job Seeker Requirements
Eligible first-time job seekers may receive an NBI Clearance free of charge. You need a barangay certification on official barangay letterhead, with the proper signature and dry seal, plus two valid IDs.
The NBI provides a separate First Time Job Seeker lane in its process. Bring the original barangay certification and your IDs when you visit.
How to Book an NBI Online Appointment Step by Step
To book an NBI online appointment, visit clearance.nbi.gov.ph, create an account or log in, complete your profile, select a branch and schedule, choose a payment method, and save your payment reference number.
Check every detail before payment. Your full name, birth date, civil status, birthplace, and address should match your valid government IDs.
Step 1: Open the Official NBI Clearance Website
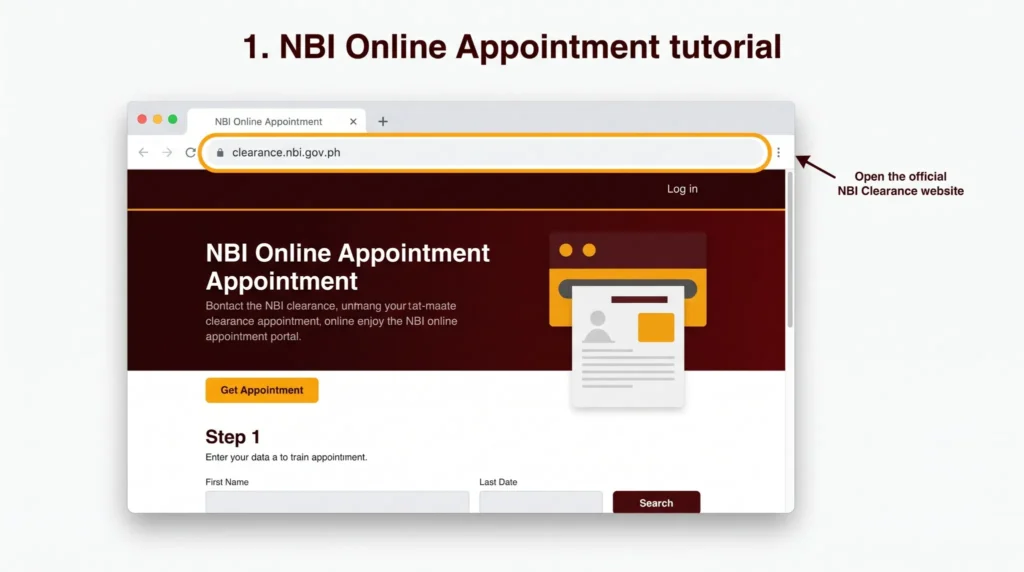
Go to clearance.nbi.gov.ph using a secure browser. Double-check the spelling before entering your information.
Avoid opening links from unknown Facebook comments, agents, social media messages, or websites that look similar to the official NBI portal.
First-time job seekers applying for the free clearance under RA 11261 use a separate portal: firsttimejobseekers.nbi.gov.ph. Do not use the regular portal for free clearance applications.
Step 2: Create an Account or Log In
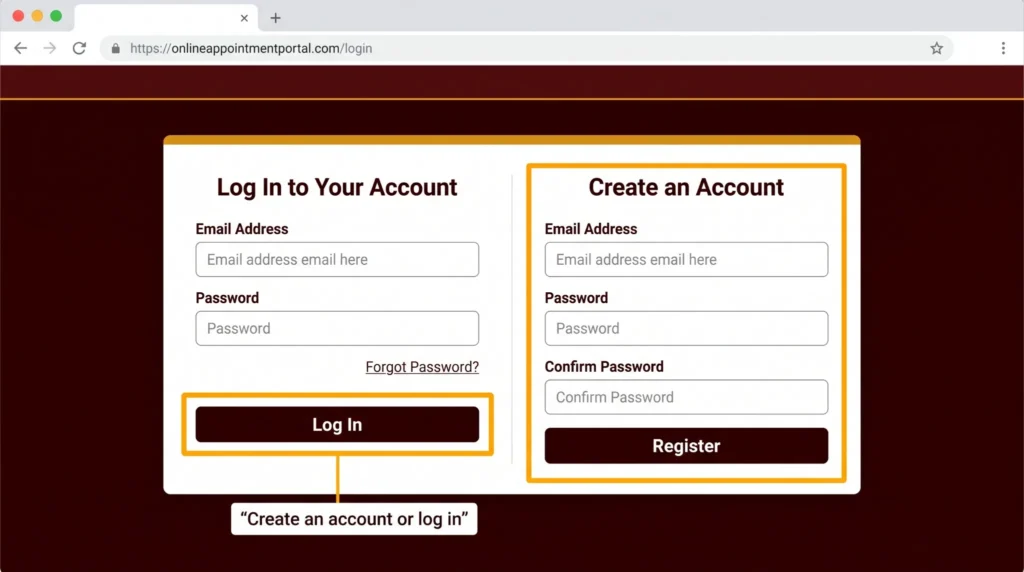
New applicants click Sign Up and fill in the registration form. Returning applicants log in with their existing email address and password.
During registration, you will see this important question: “Do you have an NBI Clearance issued from 2014 to present?”
Select YES if you have a previous NBI Clearance from 2014 onwards and your NBI ID number is available from your old clearance. The system will pull your existing profile so you do not have to fill everything from scratch.
Select NO if this is your first NBI Clearance, your old clearance is from before 2014, or you do not have your NBI ID number. A fresh applicant record will be created.
Selecting the wrong option causes confusion in the system. If you are unsure, select NO and proceed with a fresh application.
Verify Your Account via OTP
After registration, the system sends a 6-digit One-Time Password to your registered mobile number. Enter it within 5 minutes. If the OTP does not arrive, check your mobile signal; weak reception is the most common cause. You can request a new OTP after 30 seconds.
Step 3: Complete Your Personal Information
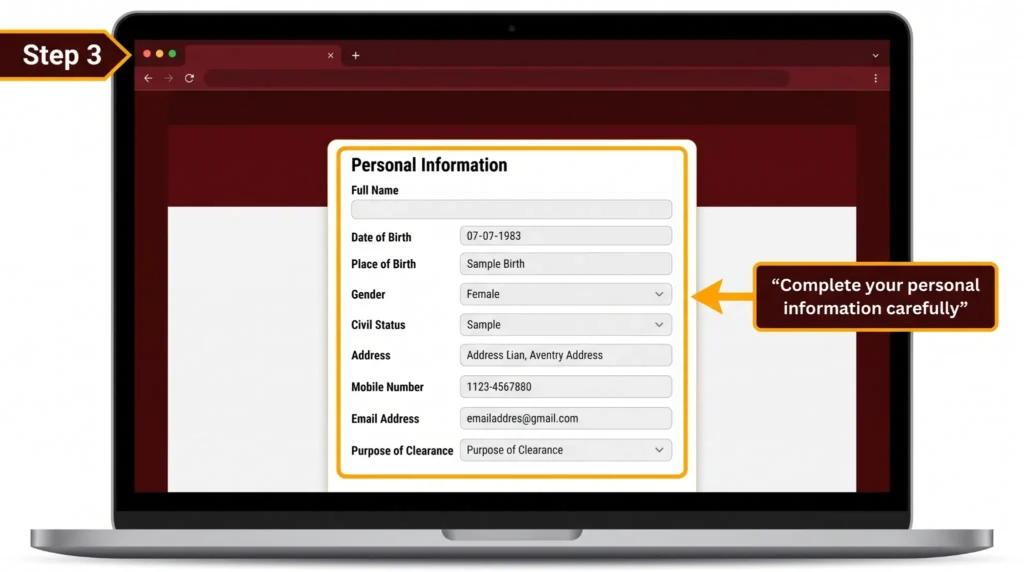
Enter your details carefully. Use your legal name, not a nickname or shortened name.
After OTP verification, the full profile form appears. Fill in every field accurately — this information will appear on your final printed clearance. Do not use abbreviations, nicknames, or shortened names.
Personal Details: Complete legal name with full middle name, date and place of birth, citizenship.
Contact Information: Complete address — street, unit, barangay, city. Write “Quezon City” not “QC.” Active mobile number and email address.
Family Background: Spouse’s full name and birthplace if married. Father’s complete name and birthplace. Mother’s complete maiden name and birthplace.
Physical Description: Height in centimeters, weight in kilograms, complexion, identifying marks such as tattoos, scars, or moles. Write “NONE” if there are none.
Other Information: Educational attainment, occupation, religion.
Do not leave any field blank. Write “NONE” for fields that do not apply to you. Once you save and proceed to the next step, corrections become very difficult. Double-check everything before clicking Save Information.
Review and Apply for Clearance
After saving, a summary of all your submitted details appears. Read this carefully. If you spot any mistake, click Edit Information and fix it now. Once you click Apply for Clearance, your information is locked — corrections after this point require visiting the branch in person.
Select the purpose of your NBI Clearance application accurately — Local Employment, Travel Abroad, Government Transaction, Business Permit, etc.
Step 4: Select Your Valid IDs
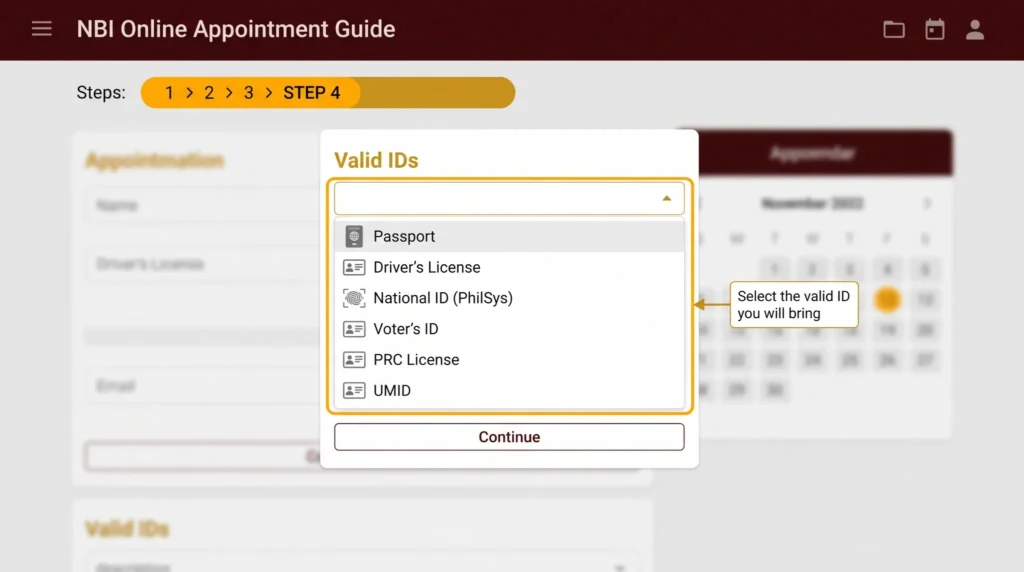
The portal may ask you to select or enter the valid IDs you plan to bring. Choose IDs that you already have and make sure they are not expired or damaged.
Do not select an ID that you cannot present at the branch. NBI staff may ask for the exact documents listed in your application.
Step 5: Choose an NBI Branch
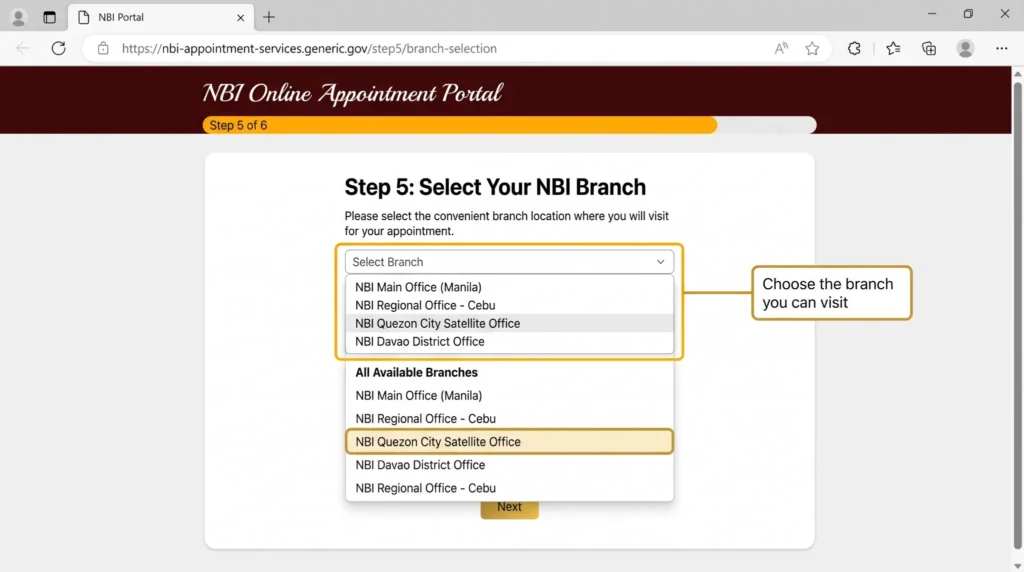
Select the branch that is most convenient for you. The portal will show available locations and appointment options.
Choose a branch you can actually visit. Do not select a faraway branch only because it has an earlier date unless you are sure you can attend.
Step 6: Pick Your Appointment Date and Slot
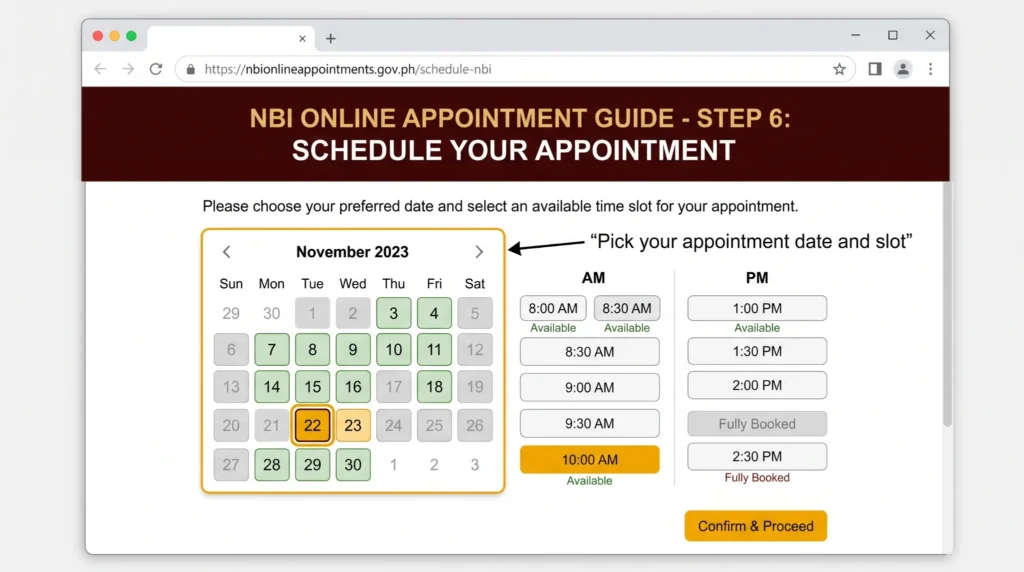
Choose an available date and time slot. Save the date, branch, and appointment period immediately.
Many branches use AM and PM appointment periods. Arrive early, especially at busy Metro Manila branches.
Step 7: Choose a Payment Method
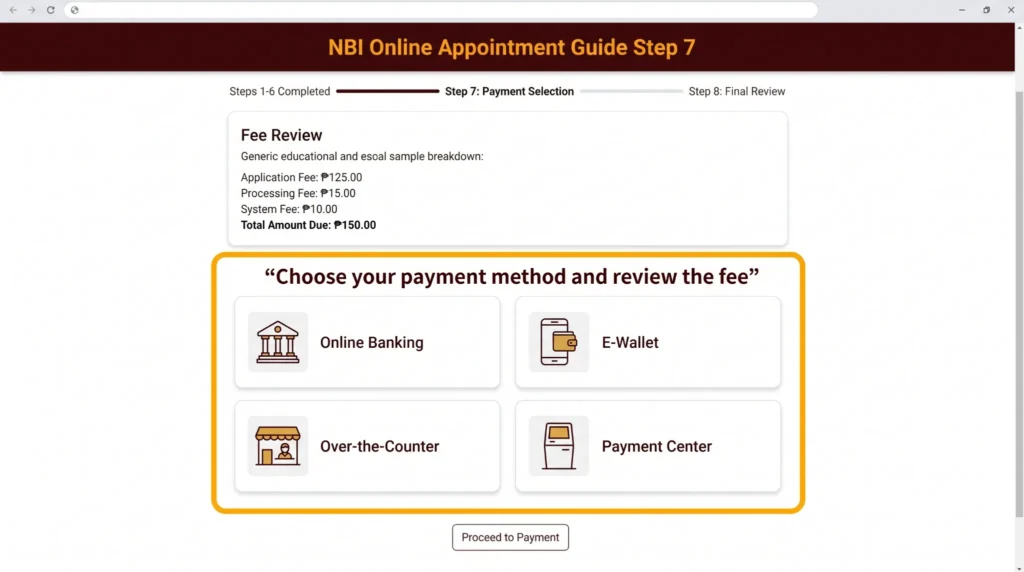
Select a payment option shown by the official portal. Review the fee before you continue.
For many online payment options, applicants see ₱155: ₱130 for the NBI Clearance plus ₱25 service fee. The final payment screen is your most important confirmation.
Step 8: Save Your Appointment and Payment Details
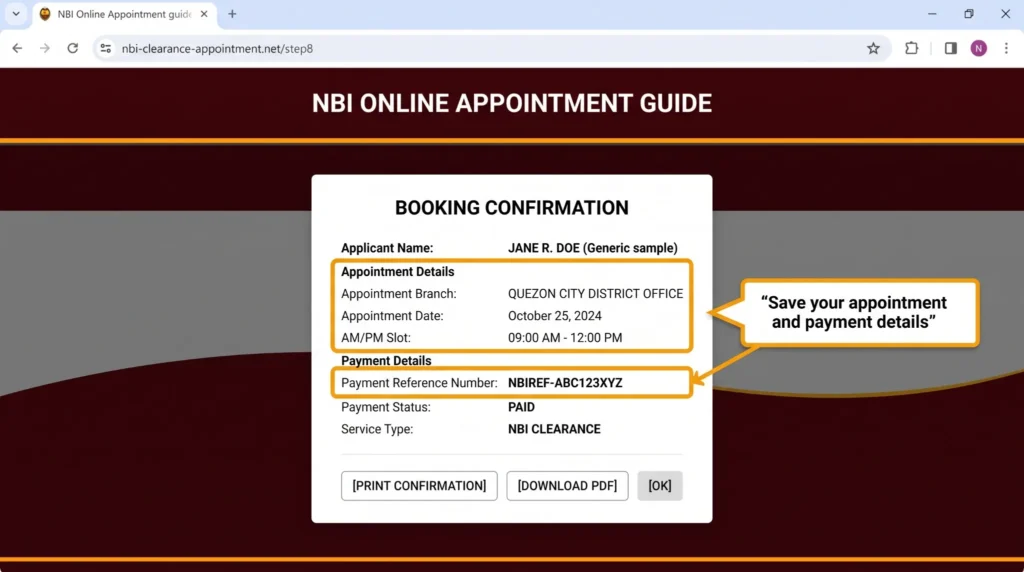
After booking, save:
NBI Appointment Slots: Best Time to Check
NBI appointment slots depend on branch capacity and the live availability shown in the official NBI portal. There is no published nationwide NBI rule confirming that all appointment slots release every Monday at midnight.
Some applicants report checking around Monday midnight because they sometimes see new dates or slots then. Treat this only as an unofficial user tip, not a guaranteed NBI schedule.
Best Ways to Find an NBI Appointment Slot
Try these practical steps:
What to Do When No NBI Slots Are Available
If your preferred NBI branch has no available slots, do not panic. Check other locations in your city or nearby cities.
For example, an applicant in Quezon City may also check U.N. Avenue, Alimall Cubao, Robinsons Galleria, Robinsons Novaliches, Robinsons Metro East, or Quezon City Hall if these locations appear in the live portal.
Appointment availability can change, so revisit the official portal instead of creating duplicate accounts.
NBI Branches and Clearance Centers
NBI has clearance centers in Manila, Quezon City, Mandaluyong, Pasig, Muntinlupa, Parañaque, Caloocan, Marikina, and other locations across the Philippines. Always confirm your final branch through the live appointment portal because branch availability can change.
The main NBI Clearance Center is located on U.N. Avenue, Ermita, Manila. It is one of the most recognized clearance locations in Metro Manila.
Popular NBI Clearance Centers in Metro Manila
| NBI Clearance Center | Location | Published Office Hours |
|---|---|---|
| NBI Clearance Center | U.N. Avenue, Ermita, Manila | 7:00 AM–5:00 PM |
| Quezon City Hall | Makatarungan Street, Diliman, Quezon City | 7:00 AM–5:00 PM |
| Mandaluyong City Hall | Shaw Central Mall, Mandaluyong City | 8:00 AM–5:00 PM |
| Muntinlupa City | Starmall, Alabang, Muntinlupa City | 8:00 AM–5:00 PM |
| Robinsons Place Manila | Basement 1, Ermita, Manila | 9:00 AM–6:00 PM |
| Robinsons Galleria | Basement 1, Ortigas Avenue, Quezon City | 10:00 AM–7:00 PM |
| Robinsons Metro East | Level 4, Marcos Highway, Pasig | 10:00 AM–7:00 PM |
| Alimall Center | Araneta Center, Cubao, Quezon City | 10:00 AM–7:00 PM |
| Marikina Riverbanks | A. Bonifacio Avenue, Marikina City | 8:00 AM–5:00 PM |
| LRT North Mall | Rizal Avenue Extension, Caloocan City | 8:00 AM–5:00 PM |
Do not assume every office will show appointment slots every day. The final branch list inside your NBI account is the one that matters for booking.
What to Wear and Bring to Your NBI Appointment
NBI does not publish a detailed nationwide dress code for NBI Clearance applicants. However, smart casual clothing is the safest choice because NBI takes your official clearance photo at the branch.
Wear clean, neat, and presentable clothing. Avoid tank tops, very casual sleeveless shirts, overly revealing clothes, or anything that may look unsuitable in an official identification photo.
Recommended NBI Appointment Outfit
Wear:
Avoid:
Final Appointment Checklist
Before leaving home, check these items:
Free NBI Clearance Checklist PDF
Going to an NBI branch unprepared is one of the most common reasons Filipinos get turned away or face delays on appointment day. We created a free printable checklist that covers everything you need to prepare before your visit, documents to bring, what to wear, and important reminders — all on one page.
Download the checklist, print it out, and bring it with you on appointment day so nothing gets missed.
What Happens at the NBI Branch?
At the NBI branch, staff verify your appointment, confirm your identity, capture your biometrics, check your record, and release your NBI Clearance if you receive a No Hit result.
Arrive before your appointment period. Busy branches may have long queues, especially during mornings, lunch hours, and after weekends.
NBI Branch Process Step by Step
What Is NBI Biometrics?
NBI biometrics is the identity verification process. NBI staff capture your photograph, fingerprints, and signature through their system.
Your fingerprints help NBI verify your identity and check records accurately. Your photo is also taken at the branch, so you do not usually need to bring printed ID photos.
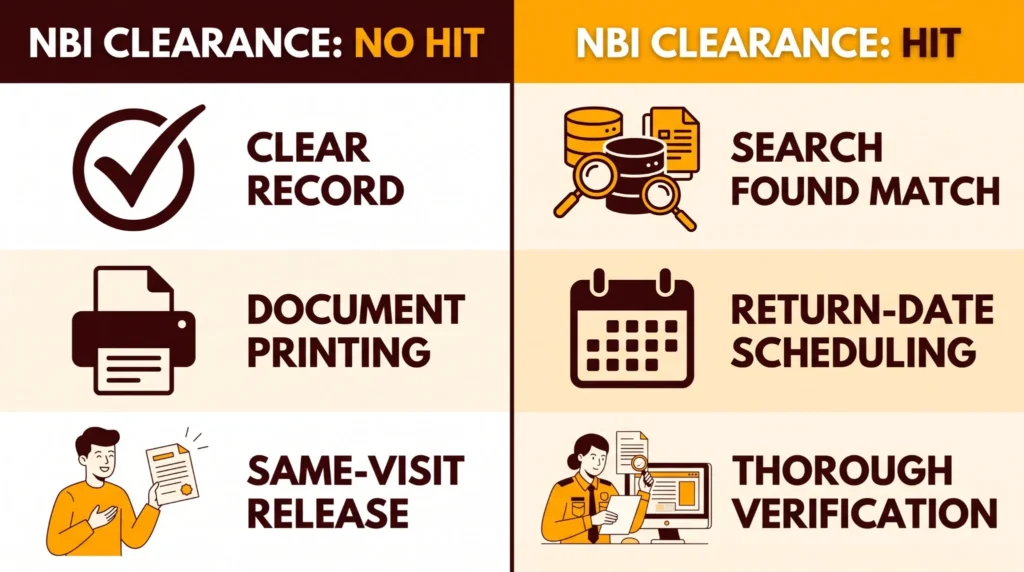
NBI Clearance No Hit vs HIT
An NBI No Hit result means the NBI system does not need extra record verification before releasing your clearance. A HIT result means NBI needs additional checking before it can release the document.
A HIT does not automatically mean you have a criminal case. It can happen because NBI needs to verify a name match or related record in its database.
NBI Clearance No Hit
If you receive a No Hit result, you usually proceed to printing and releasing. Many applicants receive their NBI Clearance on the same day after biometrics and verification.
Your actual total time depends on the branch queue, system status, and number of applicants. The official processing flow itself is short, but waiting time can be longer.
NBI Clearance With HIT
If your result shows HIT, NBI will give you a return date. Keep your receipt, appointment details, and valid IDs because you will need them when you return.
Do not panic. A HIT means your application needs review. It does not immediately mean that you have a criminal record.
For the complete HIT guide including Quality Control interview steps and documents needed, read our NBI Clearance HIT Guide.
NBI Quality Control Interview
Some HIT applicants may be sent to Quality Control for an interview and verification. Answer questions honestly and bring any documents that NBI staff ask you to present.
Quality Control exists to make sure the correct applicant receives the correct clearance result. Follow the release date and instructions given at the branch.
Common Mistakes to Avoid
These are the most frequent reasons applicants get turned away or face delays — all avoidable when you know them in advance.
Bringing a different ID from what you selected online. If you registered with a Driver’s License but bring your Passport, the staff may reject your application. Always bring the exact ID you encoded during registration.
Bringing non-government IDs. Company IDs, alumni cards, S&R membership cards — these are never accepted. Only government-issued IDs from the official NBI list are valid.
Spelling mistakes in your application. Once you click Apply for Clearance, your information is locked. A single wrong letter in your name or birthplace can cause embassy or employer problems later. Check every detail before saving.
Improper attire. Sleeveless shirts, shorts, and slippers will get you denied entry at many branches. Dress in smart casual clothing — your official photo is taken at biometrics.
Forgetting your reference number. Without the reference number, staff cannot locate your application in the system. Save it in at least three places — screenshot, written note, and printed application form.
Paying through fixers or unofficial websites. Some applicants pay random agents on Facebook or unofficial NBI-looking websites and end up with no actual application. Only pay through the channels listed inside the official NBI portal.
Booking the wrong branch. Once payment is made, your branch is locked. Changing requires contacting NBI support and is not always approved. Choose a branch you can realistically visit.
Arriving in improper attire after traveling far. Check the dress code before leaving home. Being turned away after a long commute because of a sleeveless shirt is entirely avoidable.
NBI Clearance Renewal Online
If you have an existing NBI Clearance issued from 2014 onwards and your personal details have not changed, you may qualify for Quick Renewal — no branch visit needed, clearance delivered to your address in 5 to 10 business days.
For Quick Renewal, log in to clearance.nbi.gov.ph, look for the renewal option in your dashboard, enter your NBI ID number from your old clearance, select delivery option, and pay ₱355 for Metro Manila or ₱430 for provincial delivery.
For Standard Renewal at a branch, book an appointment the same way as a new application, bring your old clearance and two valid IDs, and pay ₱155.
You need a completely new application — not renewal — if your name changed due to marriage, your civil status changed, your old clearance is from before 2014, or the portal does not show a renewal option.
For the complete renewal process, fees, and eligibility check, read our NBI Clearance Renewal guide.
How to Renew NBI Clearance Online
Bring your old NBI Clearance if you are collecting a renewed copy at a branch. It can help staff identify your earlier record.
When to Submit a New Application Instead
Submit a new NBI Clearance application when:
Special Cases
First-Time Job Seekers: Under Republic Act 11261, first-time job seekers get one free NBI Clearance in their lifetime. Register at firsttimejobseekers.nbi.gov.ph — not the regular portal. Bring a Barangay First-Time Job Seeker Certification and signed Oath of Undertaking from your Barangay Hall. This benefit is used only once — it cannot be repeated.
OFWs and Filipinos Abroad: OFWs with a previous clearance from 2014 onwards can apply online and select international delivery. New applicants abroad submit NBI Form No. 5, fingerprints, and passport copy through the NBI Mailed Clearance Section at mailedclearance@nbi.gov.ph. For the complete OFW process, read our NBI Clearance for OFW guide.
Foreign Nationals: Foreigners with an Alien Certificate of Registration (ACR I-Card) can apply at the NBI main office or regional offices. Bring ACR I-Card and valid passport.
Minors aged 15 to 17: Must be accompanied by a parent or legal guardian. Bring PSA Birth Certificate and the guardian’s valid ID. Students using school ID must bring the current semester registration form alongside it.
Students: School ID alone is not sufficient — pair it with a current registration form or enrollment certificate plus a PSA Birth Certificate as second document. For scholarship and OJT applications, apply at least 2 weeks before deadline to allow time for HIT resolution.
Common Problems and Solutions
No appointment slots available: Try checking the portal around Monday midnight when new slots often appear. Try smaller branches and provincial offices. Check regularly — cancellations free up slots throughout the week.
Payment shows as pending: Do not pay again immediately. Wait 30 to 60 minutes and check your NBI account. If still pending after 24 hours, email nbiclearance@nbi.gov.ph with your GCash receipt and reference number.
Forgot reference number: Check your NBI account dashboard, email inbox, spam folder, GCash transaction history, and phone screenshot folder. Contact NBI support if still not found.
Missed your appointment: Log in and check your application status. If your payment is still valid and it has been less than 15 days, go to the same branch as a walk-in with your reference number. After 15 days, rebook with a new payment. Read our Missed NBI Appointment Guide for full steps.
NBI website not loading: Refresh the page, clear browser cache, try a different browser, or use a more stable connection. Never submit forms or make payments while the page is behaving unstably.
Wrong personal information entered: Report to NBI staff immediately when you arrive at the branch and before biometrics are completed. Corrections after printing require a new application.
Tips from Applicants
Use GCash for payment. It gives the fastest confirmation and an instant SMS receipt. Pre-load at least ₱160 before starting the booking process so payment goes through immediately when you find a slot.
Bring extra IDs. Even if one is your primary, keep a second ID accessible. Some staff request cross-verification with a second document.
Screenshot every screen during registration. If something goes wrong or your application has an error, screenshots of each completed step serve as evidence of what you submitted.
Book Tuesday to Thursday appointments. Monday queues are heavy because new applicants rush in at the start of the week. Friday afternoons have slower staff movement and possible system delays before the weekend.
Avoid the UN Avenue main office on Mondays. It is the busiest NBI branch in the country. Mall satellite offices nearby typically have shorter queues for standard No Hit applications.
Apply early if you have a deadline. No Hit clearances are released the same day but HIT cases take 5 to 15 working days. Apply at least 3 to 4 weeks before your submission deadline.
Download your printed application form. After payment, go to the Transactions tab and download your application form with barcode. Print it or keep a clear screenshot. Many branches require this form at the information desk.
Missed NBI Appointment, No Slots, Login Problems, and Website Errors
Most NBI appointment problems can be handled through your original NBI account. Do not create multiple accounts or pay again until you check your existing application status.
Save your receipts, screenshots, and reference number. These details help when you need to contact NBI Clearance support.
What Happens If You Miss Your NBI Appointment?
If you miss your NBI appointment, log in to your account and check whether the portal allows you to select another date or gives instructions for the existing application.
Do not assume your appointment moves automatically. Keep your payment receipt and NBI reference number, then contact NBI Clearance support if you cannot find an option inside your account.
How to Reschedule an NBI Appointment
To reschedule an NBI appointment:
Do not create a duplicate account or repeat payment unless NBI support specifically tells you to do so.
What If No NBI Slots Are Available?
Check another branch, another date, or another nearby city. Return to the portal regularly because available slots can change when other applicants cancel or when NBI opens more dates.
Use the Monday-midnight check only as an unofficial user tip. It is not a published guarantee from NBI.
Forgot NBI Password
Use the account recovery or forgot-password option on the official portal. Enter the email address connected to your NBI account.
Check your spam and junk folders for password-reset messages. Avoid making a second account with different details because duplicate accounts can cause confusion later.
Lost NBI Reference Number
Check these places first:
If you still cannot find it, contact official NBI Clearance support and provide your full name, registered email address, branch, appointment date, and proof of payment.
NBI Website Not Working
The NBI website can experience temporary technical issues. Refresh the page, clear your browser cache, switch browsers, try a stable internet connection, or return later.
Take a screenshot of any error message. Do not repeatedly submit payment or registration forms while the website is loading incorrectly.
Official NBI Contact Information
| Contact Method | Details |
|---|---|
| Official Portal | clearance.nbi.gov.ph |
| Landline | (02) 8524-1277 |
| Mobile | 0939 150 2880 |
| nbiclearance@nbi.gov.ph | |
| Mailed Clearance | mailedclearance@nbi.gov.ph |
| Main Office | NBI Building, Taft Avenue, Ermita, Manila |
| Office Hours | Monday to Friday, 7:00 AM to 5:00 PM |
Frequently Asked Questions (FAQ’s)
Final Words
An NBI online appointment becomes simple when you use the official portal, enter correct details, save your payment reference number, and bring two valid IDs. The usual online amount is ₱155 when the ₱130 NBI Clearance fee includes a ₱25 service fee, but always verify the total displayed in your own payment page. Visit clearance.nbi.gov.ph now and book your NBI Clearance appointment safely.

Maria Santos Content Writer
Maria Santos is a Manila-based government services researcher and the creator of NBIClearanceOnline.com. After spending years helping friends, family, and officemates navigate the confusion of NBI Clearance applications, wrong IDs, missed slots, unexpected HIT results, and payment problems, she realized most Filipinos were going through the same stressful experience alone. That frustration became this website. Every guide on NBIClearanceOnline.com comes from real experience personally going through the NBI process multiple times for employment, travel, and visa requirements and is regularly updated to match the latest official procedures at clearance.nbi.gov.ph. Her goal is simple: no Filipino should waste a day off work because of a missed step or unclear requirement.
Article Summary
| Article | NBI Clearance Online Guide |
| Description | Your complete guide to NBI Clearance appointments, renewal, payment, fees, requirements and the latest Philippine Government updates. |
| Website | Nbiclearanceonline.com |
| Publisher | NBI Clearance Online |
| Category | Government Services |
| Reading Time | 8 Minutes |
| Last Updated | July 2026 |
| Fact Check | ✓ Verified Information |
| Author |  NBI Clearance Online Team Content Research & Editorial Team |
| Publisher Logo |  |